
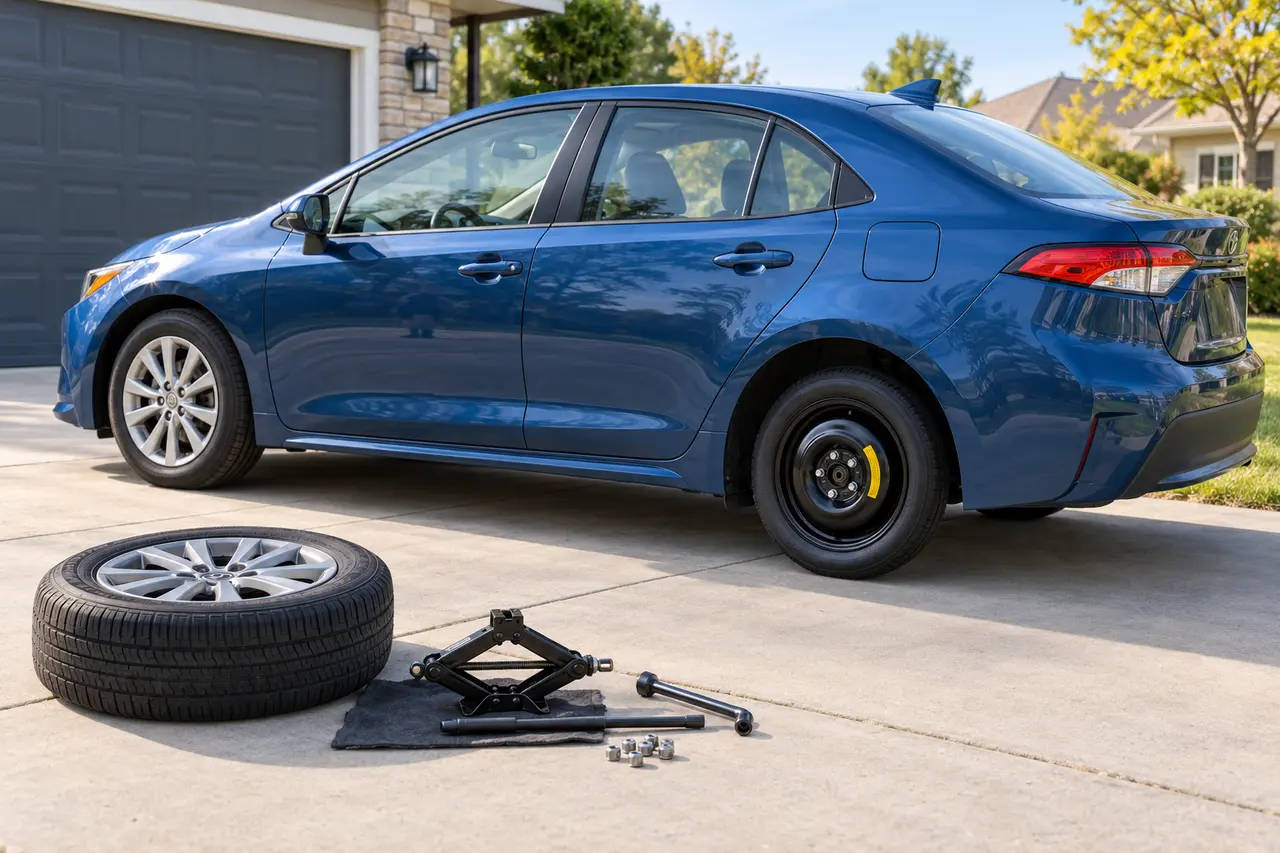
A spare can go on the front only when the vehicle and spare instructions permit it. Many vehicles recommend placing a compact donut on the rear, which may require moving a good rear wheel to the front before installing the spare.
The front wheels steer and often carry more braking and driving load. Compact-spare diameter, width, traction, and brake clearance can make front placement unsuitable.
What Does the Owner’s Manual Control?
Look for a specific axle restriction in the wheel-changing section and on the spare label. All-wheel-drive, front-wheel-drive, electric, staggered-tire, and large-brake vehicles can have unique placement rules.
The manual identifies compatible spare types, storage and release instructions, approved jack points, fastener torque, and temporary-use limits. The markings on the spare provide additional pressure, speed, load, and service information. Use the more restrictive instruction when required and seek manufacturer guidance when information appears inconsistent.
Which Spare-Tire Type Is Involved?
A matching full-size spare may be approved at any position. A donut or full-size temporary spare can have axle restrictions. A directional or staggered road tire adds further limits even when full size.
| Factor | What to check | Why it matters |
|---|---|---|
| Steering axle | Front wheels control direction | Narrow spare can change response |
| Drive axle | Front, rear, or all wheels transmit torque | Diameter mismatch can affect driveline |
| Brake clearance | Front brakes are often larger | Temporary wheel may not physically clear |
| Overall diameter | Compare approved spare specification | Mismatch affects wheel-speed systems |
| Tire direction | Check directional arrows or asymmetry | Temporary mounting may have limits |
| Manufacturer rule | Manual and spare label | Controls final placement decision |
How Do You Check Compatibility?
Confirm physical fit and approved position before lifting. A spare that bolts on but contacts a brake caliper or has an excessive diameter difference is not compatible. Do not use spacers or different fasteners to force fit.
A spare supplied for another vehicle may have the wrong bolt pattern, center bore, offset, overall diameter, load capacity, brake clearance, or tire construction. Do not force a wheel onto the hub or substitute wheel hardware. Use only a spare and fasteners approved for the vehicle and required position.
How Do You Inspect the Spare Before Use?
Check pressure and damage before moving two wheels. When a rear-to-front swap is required, inspect the good rear wheel and ensure both installations receive correct torque.
Check pressure when the tire is cold, meaning it has not recently been driven and heated. Inspect both sidewalls, the tread, valve, bead area, and wheel. Do not install a spare with severe cracking, a bulge, exposed reinforcement, separation, a damaged wheel, or pressure that cannot be maintained.
What Is the Correct Procedure?
If front placement is prohibited, secure the vehicle and replace the flat front wheel with a compatible normal rear wheel. Then install the compact spare on that rear position. This creates two wheel changes and requires extra time and safe conditions.
Prepare the spare and tools before raising the vehicle. Keep the parking brake applied and wheel chocks positioned as directed. Lift only at the approved point. Start fasteners carefully, snug them in a crossing pattern, lower as specified, and apply final torque with the correct specification.
What Driving Limits Apply?
Even when the donut is on the preferred axle, its speed and distance limits still apply. Stability, braking, and traction can remain different from normal.
Compact spares commonly carry reduced limits, but the exact number is vehicle and tire specific. Many are marked for no more than 50 mph or 80 km/h, while permitted distance can vary. Drive smoothly, avoid hard acceleration and braking, and travel directly to professional service. Stop for vibration, pulling, noise, pressure loss, or unstable handling.
How Do Weather, Load, and Road Conditions Matter?
Wet, icy, snowy, or steep roads increase the effect of reduced traction. Avoid abrupt steering, braking, and acceleration. Do not add snow chains to a temporary spare unless specifically permitted.
A temporary spare changes the vehicle’s available traction and may affect ground clearance. Reduce load when the instructions require it. Avoid towing, snow chains, rough roads, deep water, high-speed travel, and long detours unless the manufacturer specifically permits them with the installed spare.
What Mistakes Should You Avoid?
- Do not assume any axle is acceptable: read the exact placement rule.
- Do not force brake clearance: contact can damage the wheel or brake.
- Do not ignore all-wheel drive: circumference mismatch can load the system.
- Do not move wheels beside traffic: two changes increase exposure time.
- Do not use wrong fasteners: the wheel must clamp correctly.
- Do not forget both torque sequences: every moved wheel needs final torque.
A spare is part of a vehicle system, not a universal wheel. Guessing pressure, fit, placement, or travel limits can damage the tire, wheel, drivetrain, brakes, or body. Stop when the specified setup cannot be confirmed.
When Is Professional Help Required?
Use roadside assistance when two wheel changes are required in an exposed area, the placement rule is unclear, the spare does not clear the brakes, or the vehicle has staggered or all-wheel-drive requirements.
Roadside assistance can install a usable spare when the location permits. Towing is appropriate when there is no compatible spare, the mobility kit cannot address the damage, multiple tires are affected, the wheel or suspension is damaged, or the vehicle cannot be lifted safely.
What Should Happen After the Spare Is Used?
Restore the normal tire promptly and return every wheel to its correct position. Have both moved-wheel fastener torques confirmed and check the spare for damage.
Have the normal tire removed and inspected internally when repair is considered. Restore a compatible road wheel as soon as practical. Then check the spare, correct its pressure, replace it if damaged or aged out, and return every tool to secure storage.
How Do You Keep the Spare Ready?
Read placement instructions before a flat. Record whether a front-to-rear transfer is required. Keep enough time, tools, pressure, and roadside coverage for the more complex procedure.
Include the spare in routine tire checks. NHTSA advises checking all tires, including the spare, at least monthly when cold. Inspect before long trips and when seasons change. Confirm that the jack, lug wrench, wheel-lock key, pressure gauge, and inflator remain present and functional.
Which Spare-Tire Guides Are Related?
These pages explain the connected decisions around storage, installation, pressure, placement, age, and limited travel:
Use the complete tools checklist and roadside safety guide before beginning. A serviceable spare helps only when the vehicle, equipment, driver, and location are ready.
Quick answers
Frequently Asked Questions
Why should a donut often go on the rear?
Front wheels handle steering and often greater braking or drive loads, so some manufacturers restrict compact spares to the rear..
Can a full-size spare go on the front?
Usually when it is a true compatible match and approved for that position, but confirm the exact vehicle requirements..
What if the front tire is flat but the donut must go on the rear?
Move a compatible normal rear wheel to the front, then install the donut on the rear, following the manual..
Can a donut clear front brakes?
Not always. Some front brake packages are too large for a temporary wheel.
Does all-wheel drive affect spare placement?
Yes. Tire circumference and axle placement can affect the drivetrain, so strict distance and position rules may apply.