
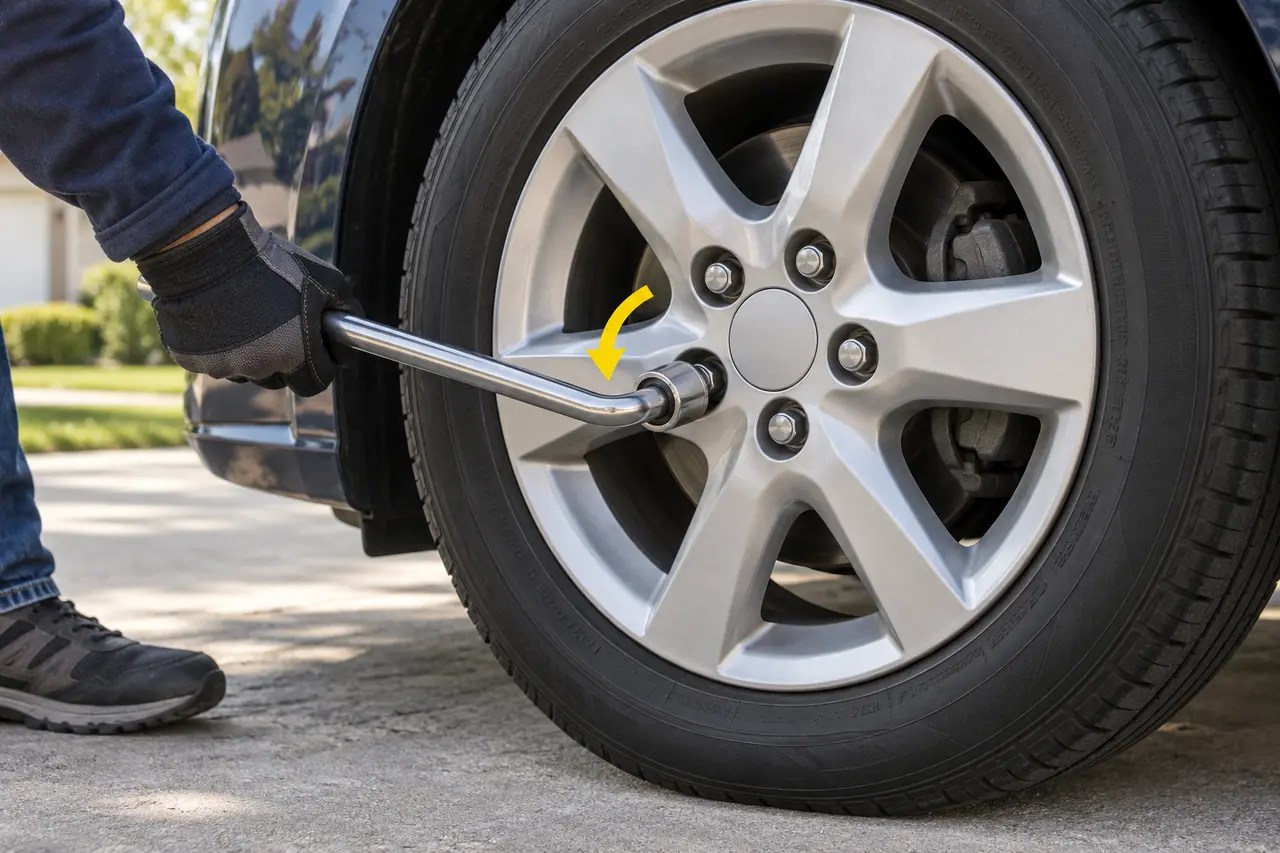
Most modern passenger-car and light-truck lug nuts loosen counterclockwise when you face the nut directly. Turn left to loosen and right to tighten, but stop and verify the manual or markings if the vehicle uses unusual, older, commercial, or specialty wheel hardware.
Direction feels confusing when you change sides of the car or work with a wrench handle above or below the nut. The rule is based on rotation at the fastener face, not whether the handle moves toward the front or rear of the vehicle.
What Is the Most Important Rule?
Look straight at the lug nut and imagine the clock hands. Counterclockwise means the top of the nut turns toward the left. Test with controlled pressure while the tire is still on the ground.
A tire-change problem should be solved without turning it into damaged hardware, a damaged vehicle, or an unstable lift. Read the vehicle owner’s manual before lifting or using a temporary repair system. Model-specific instructions control approved lift points, jack capacity, fastener torque, spare placement, tire pressure, and driving limits.
Start by protecting people. Move as far away from traffic as the vehicle can safely travel, turn on the hazard lights, apply the parking brake, and choose firm, level ground. If the car cannot reach a protected place, stay in the safest available location and call emergency or roadside services.
What Should You Check Before Acting?
Use the following checks to decide whether the task can continue. Do not treat a missing item or unsafe condition as a small delay. It may change the correct plan.
| Check | What to confirm | Safe response |
|---|---|---|
| Viewpoint | You are facing the head of the nut | Judge rotation at the fastener, not handle travel |
| Thread type | Manual shows standard right-hand threads | Verify rare reverse-thread markings |
| Socket fit | Socket seats fully with no wobble | Stop before rounding corners |
| Wheel lock | Matching key is fully engaged | Do not use a near-fit adapter |
| Vehicle support | Tire stays grounded for initial loosening | Do not apply breakout force on a raised car |
| Fastener condition | No severe rust, swelling, crack, or prior damage | Use trained service for questionable hardware |
Inspect in good light from beside the vehicle. Stop when a fastener slips, a wheel binds, a jack leans, a tire shows structural damage, or a tool does not match. More force does not correct the wrong tool, wrong part, or wrong working area.
How Should You Prepare?
Park on firm level ground, apply the brake, select the specified gear, and chock the vehicle. Remove any wheel cover correctly. Clean dirt from the nut and seat the exact six-point socket fully.
Keep passengers and pets away from the work area. Put loose cargo where it cannot roll into traffic or block an escape path. Set wheel chocks as directed by the manual. Never rely on hazard lights, cones, or a reflective vest to make a dangerous shoulder safe.
Lay out only the equipment needed for the next step. Check the spare or road tire pressure before raising the vehicle. Confirm that the lug wrench or socket fits fully and that any wheel-lock key is present. If a required part is missing, arrange help before the vehicle is lifted.
What Steps Should You Follow?
- 1Face the fastener
align your view with the lug nut head.
- 2Confirm the rule
check the manual or any left-hand-thread marking.
- 3Fit the tool
press the socket or wheel-lock key fully into place.
- 4Keep the wheel grounded
apply smooth counterclockwise force.
- 5Stop for slip
reset the socket instead of continuing on a corner.
- 6Loosen slightly
break each nut free without removing it.
- 7Lift by the manual
raise only after every fastener can turn.
- 8Inspect and finish
replace damaged parts and torque during installation.
Pause after every change in load, tool position, or vehicle condition. The setup should remain stable and easy to understand. If the next step depends on a guess, stop and find the exact instruction or request professional help.
Why Does This problem Need Special Care?
A wrench handle can point in any direction, so memorizing push down or pull up is unreliable. Some historical vehicles and specialty applications used left-hand threads on selected positions, which loosen clockwise and may carry an L mark.
Wheel and tire systems carry vehicle weight, transmit braking and driving force, and help the driver steer. Small differences in pressure, diameter, fastener clamping, or lift-point placement can affect several systems at once. A part that appears close enough may still be unsafe.
Modern vehicles can add tire-pressure sensors, large brakes, all-wheel drive, air suspension, underbody battery packs, staggered tires, wheel locks, and model-specific spare rules. These features are manageable when the correct procedure is known, but they make guessing more costly.
Which Tools and Information Are Needed?
Use the exact-size six-point socket, approved lug wrench or breaker bar, matching wheel-lock key, wire brush for external dirt, penetrating oil only where service guidance permits, gloves, light, and torque wrench for installation.
Common equipment includes the owner’s manual, a charged phone, work light, gloves, wheel chocks, pressure gauge, approved jack, correct wrench, wheel-lock key, and compatible spare or factory mobility kit. Not every page requires every tool, and not every vehicle supplies them.
Use a torque wrench only for final tightening within its rated range. Do not use it as a breaker bar. Use impact tools only with suitable sockets, controlled settings, and the training needed to protect wheel fasteners. Store heavy equipment securely after use.
What Limits Apply?
Do not use the torque wrench as a breaker bar. Do not jump on the handle, hammer a normal socket, heat an assembled wheel, or use a long extension that twists and slips. Excess force can break a stud.
A temporary spare or repair restores limited mobility. It does not return the tire system to normal service. Follow the lowest stated speed, distance, load, axle, weather, towing, and road-surface limit. Drive smoothly and go directly to a tire or repair facility.
Stop driving for vibration, pulling, rubbing, new warning lights, rapid pressure loss, smoke, odor, or unusual noise. These signs can point to poor fit, hidden damage, incorrect pressure, loose fasteners, or a problem beyond the original flat.
What Mistakes Should You Avoid?
- Do not judge by the side of the car: face each nut directly.
- Do not confuse handle direction with nut rotation: watch the fastener.
- Do not assume rare reverse threads: verify markings or documentation.
- Do not use a loose socket: it can round the nut.
- Do not remove nuts before lifting: only break them loose while grounded.
- Do not tighten by feel alone: use the stated final torque.
Do not crawl under a vehicle supported only by an emergency jack. Do not work with your back to nearby traffic. Do not place hands or feet beneath a wheel, suspension, or body area that could drop. A safe wheel change is completed from beside the vehicle.
Do not improvise with stacked blocks, a near-size socket, unapproved spacers, substitute fasteners, or a spare from another vehicle. These shortcuts can cause a fall, damage threads, reduce wheel clamping, or create brake and drivetrain interference.
When Should You Call Roadside Assistance?
Call for service when the direction is uncertain, the fastener does not move under reasonable controlled force, the socket slips, the nut is rounded or swollen, the stud turns, or a wheel-lock key is missing.
Give the provider your exact location, vehicle year and model, affected wheel, spare or mobility-kit status, and any wheel-lock problem. Mention traffic exposure, collision damage, leaking fluid, smoke, fire risk, or an unstable vehicle first. A tow may be safer than roadside work.
Professional help is also the right choice when the driver cannot kneel, turn the tools, handle the wheel, or maintain balance without pain or strain. The goal is safe recovery, not proving that the repair can be completed alone.
What Should Happen Afterward?
Inspect threads and seating surfaces. Hand-start every fastener during installation, tighten in the stated crossing pattern, lower as directed, and apply the exact final torque with a calibrated tool.
Have the tire removed from the wheel for an internal inspection when repair may be possible. Ask the technician to check the wheel, valve, TPMS sensor, fasteners, hub surface, and any parts affected by the event. Restore the normal wheel and tire as soon as practical.
After a spare or kit is used, inspect it, restore the correct pressure, replace consumed sealant, and return every tool to its fixed storage location. Record any replacement part or service need before the next trip.
How Can You Be Ready Next Time?
Keep the correct socket and lock key with the vehicle, record the torque specification, and have damaged chrome-capped or corroded nuts replaced before they become a roadside problem.
Check all tire pressures, including the spare, at least monthly when cold and before a long trip. Inspect tread, sidewalls, valve stems, wheel condition, spare age, tool operation, and sealant expiration. Save roadside numbers and vehicle instructions for offline access.
Practice finding the equipment and lift points on private, firm, level ground in daylight. Preparation reduces searching and confusion. It does not make a dangerous highway shoulder, slope, storm, or damaged vehicle suitable for a DIY change.
Which Related Guides Can Help?
Use these pages to complete the next part of the decision:
Return to the complete 12-step tire-change guide for the normal wheel-swap sequence. Also review the tool checklist and roadside safety guide before starting.
Quick answers
Frequently Asked Questions
Do all lug nuts loosen to the left?
Most modern passenger vehicles use standard threads, but rare older or specialty hardware may differ..
Does the direction change on the other side of the car?
No for standard right-hand threads. Face the nut and turn counterclockwise.
Should lug nuts be loosened before jacking?
Yes. Break them loose slightly while the tire remains on the ground.
Why will a lug nut not turn counterclockwise?
It may be over-tightened, corroded, damaged, locked, or using unusual threads. Stop before rounding it.
Can an impact wrench be used?
Qualified users can use suitable tools for removal, but final installation still needs the specified controlled torque..